One of the most valuable assets in my garden is my greenhouse. It has allowed me to grow plants that I normally would not be able to grow, produce crops that the season is not usually long enough to produce, and protect my plants from frosts, hail, or other severe weather that normally would have destroyed my garden.
But I don’t have thousands of dollars to spend on a greenhouse. I just priced out an 8’x12’ greenhouse for $3,500. I would love to have a large, professional greenhouse, but that simply isn’t financially feasible for me. So, instead I’ve found a way to make a large greenhouse that is functional, easy to build, and inexpensive. This article will explain to you exactly how to build a 12’x32’ hoop-style greenhouse for under $400.
Required Materials List
Note: All wood should be green, treated wood to resist rot. (Or you can spend more money and buy a rot resistant type of lumber such as cedar.)
- (4) 2×6 – 16’
- (2) 2×6 – 12’
- (14) 2×4 – 12’
- (19) ¾” x 20’white pvc pipe
- (9) 10mm x 10’ rebar
- (1) 20’x50’ roll of 6mm plastic
- (1) Bundle of 50 4’ wood lathe (or optional staples)
- Zip ties
- Nails or screws
- Metal banding
- Door hinges and handles
Step 1 – Laying Out the Frame
Using the 2x6s, lay out and put together your 12’x32’ frame. (You can join the two 16’ pieces with a 2’ piece of 2×4.)
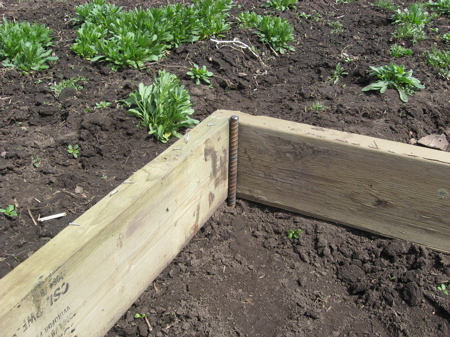
Ensure that the frame is square by measuring diagonally across it. You can temporarily keep the frame in place by pounding a 30” piece of rebar in each corner. (You can pull these out to use them in the next step.)
Step 2 – Adding the Hoops
Cut each 10’ piece of rebar into four 30” pieces of rebar. This will give you thirty-four pieces. Pound the rebar into the ground about 15” deep on the outside of your frame at two foot intervals. This will leave 15” sticking up out of the ground.
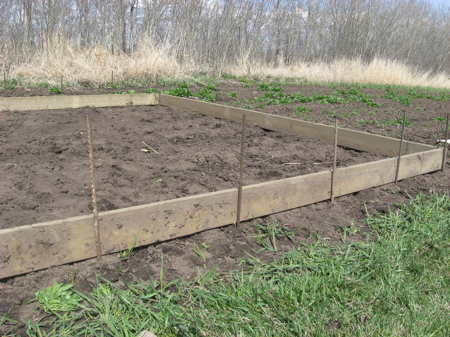
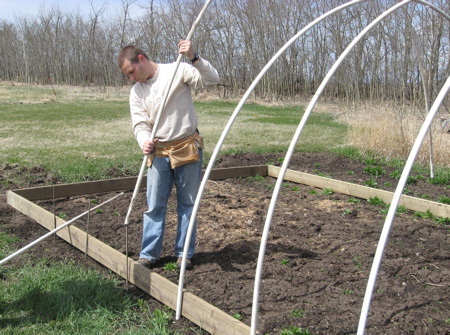
Now slide both ends of your pvc pipe over the rebar to make a hoop across the width of your greenhouse.
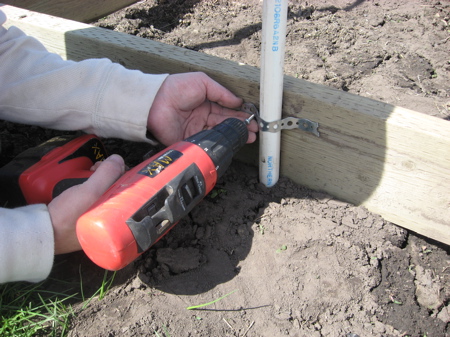
Attach the pvc pipe to the 2x6s by screwing short pieces of metal banding around the pipe.
Step 3 – Building the Ends
Cut the following pieces out of your 12’ 2x4s:
- (2) 11’8¾”
- (4) 1’6″
- (4) 4’7″
- (4) 5’7″
- (8) 1’11¼”
- (2) 4’¼”
For each end, assemble the wall according to the following diagram.
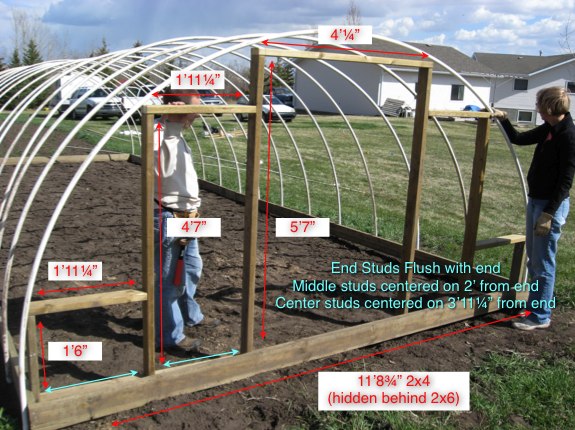
Place this wall within the 2×6 frame and nail/screw in place.
Cut (4) 28” 2×4 pieces. Cut one end at a 45º angle. Use these pieces to brace the wall.
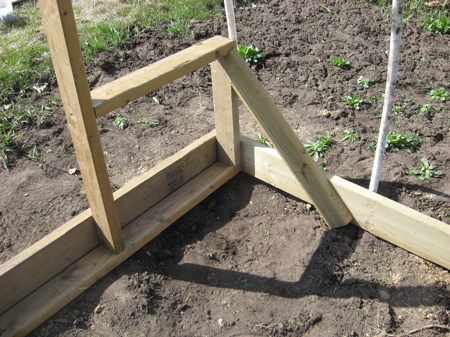
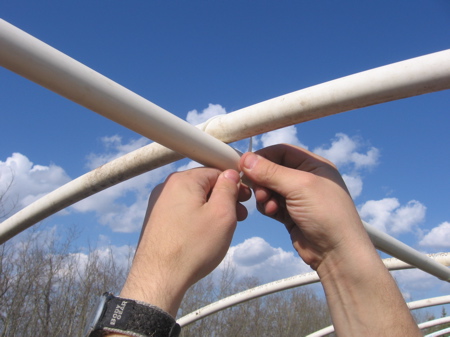
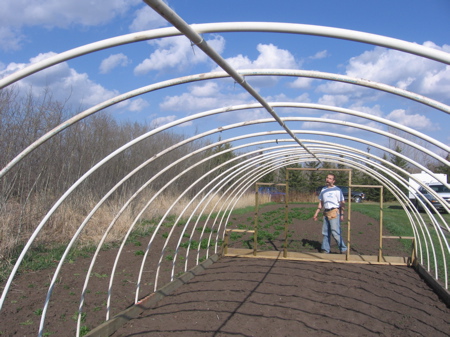
Once all of the hoops and the two ends are in place, connect two pvc pipes together and cut them to measure 32′ long. This will be the rib that will go along the top of your hoops. You can attach this rib with plastic zip ties.
Step 4 – Covering the Greenhouse with Plastic
If you are going to use wood lathe, cut 32 pieces of 20” lathe. These will secure the plastic to the sides of the 2×6 frame in between each hoop. Or optionally, you can use staples, though they may have a tendency to pull through the plastic.
Drape the plastic over the length of the greenhouse. Be sure to have enough overlap at the ends to cover the end walls. Pull the plastic snug and attach to the 2x6s at one end using the wood lathe or staples. Go to the other end, pull snug, and attach in a similar manner. Do this at the center, and then along the rest of the length of the greenhouse.
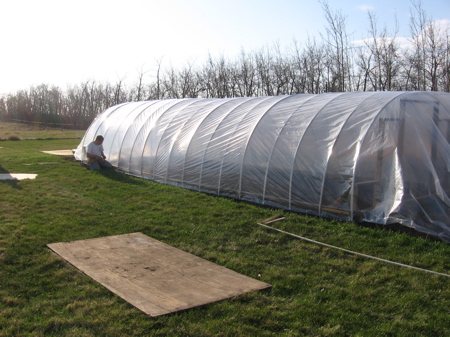
Note: If you can do this in warm weather, there will be less sagging later. Make it as snug as you can without causing damage to the plastic.
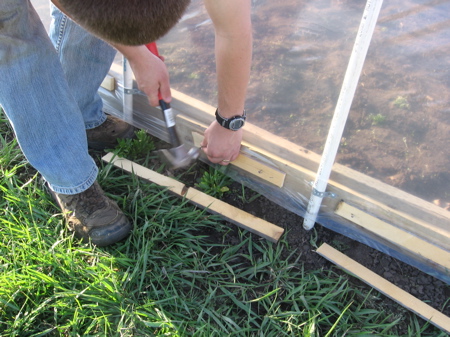
To attach the plastic to the ends, pull the plastic straight down, and attach with lathe. Then pull the plastic out to the sides. This will give you extra plastic along the outside edge. Fold the plastic back towards the center and attach. For the end with the door, cut out the plastic leaving a few inches of over hang to wrap inside and attach.
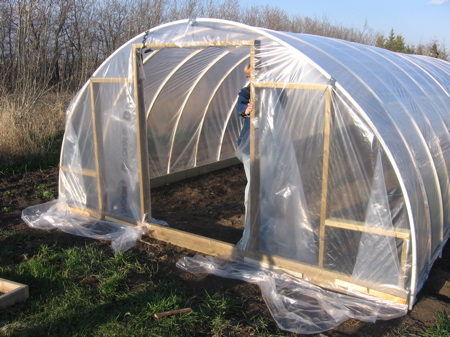
Step 5 – Adding the Door
Before you cut your pieces, check the actual measurements for the space you have. Your wall may sit a little different than mine. It’s always better to go a little small or your door may not fit. But if the measurements are the same, cut the following pieces out of your 12’ 2x4s:
- (2) 4’11”
- (2) 3’9″
Nail these together to make your door frame. Lay a 2×4 diagonally across the frame and nail in place. Trim off anything that hangs over the frame of the door. This will be on the inside of your door. Too much wood hanging over will jam your door. Attach the hinges to the door frame.
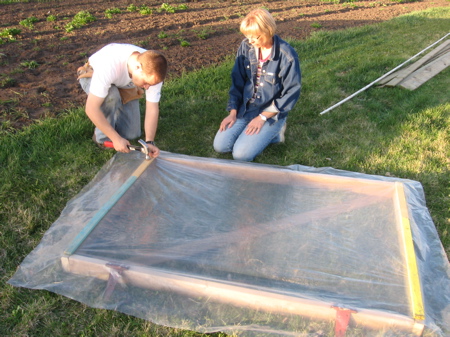
Cover the outside of the door with remaining plastic or you can use plywood if you would rather. You can attach the plastic with the wood lathe or staples. There should be about 4” of overhang of plastic on all sides.
Attach the door handles to the door. Mount the door to the frame.
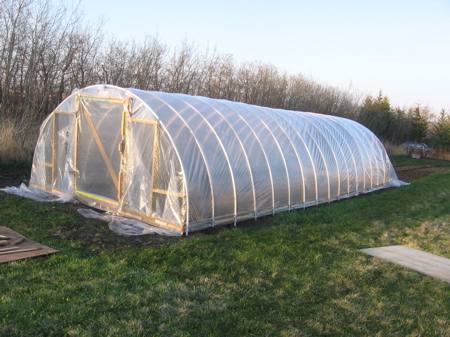
And there you go! You can have a beautiful 12’x32’ hoop-style greenhouse that can be built in a weekend and all for less than $400.
——
Update: July 11th, 2008
To see just how well this greenhouse works, see my July Greenhouse Update.
Update August 5, 2009
For an new and improved version, see An Inexpensive, Hail Proof, PVC Pipe Greenhouse.
Update November 29, 2010
Improved design. Changed material list from half inch PVC to three-quarter inch PVC.
456 replies on “How to Build an Inexpensive Hoop-Style Greenhouse”
I live on Toronto Ontario. I have been growing tropical fruit trees for few years in a sunroom, on the south side of the house. This year since I have too many trees I am building a 20ftx36ft green house. I wonder ifany one have poured a concreat floor ? is it insulated? is any one heating up the floor ? any information will be more than appriciated. Thank you
Do you use it during the winter.
Nick: I do not.
What do you do about ventilation? That’s the only flaw I can see with this greenhouse, it would get very hot in the height of summer and the plants would literally cook. Without being able to lift the sides, how do you get good air flow to control summer temps?
Thanks.
Robin
Robin: I leave both of the end doors open throughout the summer – this provides plenty of ventilation.
Nice greenhouse!
Where can I buy 20′ pvc pipe and 11mm poly cover?
I would need one greenhouse in my backyard, good benchmarking.
Cheers!!
You can buy PVC pipe / poly at any big box DIY store
Thanks for information. I will try to construct the same hothouse of the house.
Like design and princaples, however we have a wind and sun temperatures of approx.40degrees in the summer. How does the p.v.c. pipe stand up to the ultra violet rays? i.e becomes brittle in our climate,also I would like to use shade cloth.
Laurene: Yes, the PVC will become brittle over time.
Or at any Electrical wholesaler.
Couldn’t you use gray electrical PVC conduit? It is made to stay outside in the sunlight.
PVC will break down when exposed to the sun for long periods. It can also react with plastic coverings if the two are in direct contact. I wraped all of the pvc with duct tape prior to installing. i used gorilla tape and it is still holding up great over a year later. Im in central California and it gets plenty hot here.
I used black schedule 40 electrical conduit. It is made to hold up well against sun exposure (just like black nylon cable ties). A little more expensive, but well worth the extra bucks. My electrical supplier dropped the pipe off for me at no charge, so maybe I did not pay more after all.
If ultraviolet rays are a problem try using electrical pvc. I believe it is sunlight resistant. Costs a little more then plumbing pvc but would last much longer time wise.
Here this tipe of green house is not guaranty,-4celcius and all frozen,I build one insulated north and west it is the wall of my house and the heat of my house go thru the wall and lift much more the freezing degre.This year it freeze inside on november 6.
To handle a deeper freeze you would double the tarp and use a fan to keep an air-gap. If you worry about snow load or wind add 1×4″ to the top and sides with screws the length of the structure. Those are proven upgrades that allow hoop houses in Montana and North Dakota. Also, I advise using a woven tarp, it’s a little more upfront cost but several have lasted as long as 10+ years. The inexpensive plastic may not hold up to UV rays very well and disintegrate in a short time.
just wanted to say THANK YOU! i had already started my green house — and was in huge debate on how to finish off the ends – oh happy day i found your link on PINTEREST – THANK YOU for your tutorial — loved the piece down center top to brace it using the zip ties. no cutting no 4 way joints to order — hawgsnkisses from farmer sue!
I just want to say thankyou for the idea I am going to start build my Green house for a aquaponics in puerto rico this is a real inexpensive Green house thankyou again when I finished i am goin to send you Photos
We live in the Grande Prairie area and very often have to deal with extreme winds and severe thunderstorms.
Have you had to deal with any of these issues and how does your design hold up?
Barb: The only weather related problem I’ve had with this design is heavy snow load. Wind, rain, and even hail have never been a problem – even the most severe weather!
Thanks for giving me the inspiration to build a hoop-style greenhouse myself. I have taken you overall design at added a few alternatives. It’s only 4 x 4 m in size so a 4×6 m white reinforced tarp fits as covering. The sides are raised about 0,5 m from the ground so plants can grow tall even close to the sides. The frame rest on 6 small cyndrical concrete pipes as fundation that was trash to others but building material to me. The wood frame has a extra framing to make it more stabil to wind pressure. Ends are made of plywood and with a door in each end for maximum ventilation on hot days. Total costs about 400 US$. In Denmark using plastic in stead of glas as greenhouse covering makes the temperature inside good for tomato, cucumber etc. but not hot enough for pebers. PVC pipes and tarp are removed for the winter making the remaining frame a bad winter resting place for pests and bugs. I can only hope others will enjoy an inexpensive greenhouse as well. Our family do!
I built a similar greenhouse 30yrs ago only I added wooden bracing lengthwise from door to door. Instead of poly I then pop riveted sheets of corrugated fiberglass to the frame and base. slightly more expensive but it lasted for over twenty years and would still be there if we had not sold to a developer. Cost effective in the long run.
You can use I bolts around the entire greenhouse and run rope over the top of the plastic to help strap it to the pvc for areas that have a lot of wind. It will help the plastic during winter months
hi i live 2 hours east of toronto and i like to build this but what big box store sells that kinda of plastic film? as Homedepot and Lowes does not carry it can you send a link for where i can buy it near Peterborough Ontario
Mike: The big box stores will only carry the thinner 6mil stuff – you want to order online from NorthernGreenhouse.com!
Industrial supply store. Usually privately owned. Here in NS it is …Seaboard Industrial supplies
Bookmarked your page a couple of years ago. I built a 12×24′ wood frame and installed the PVC pipe last year. It sat in one garden until yesterday when I deconstructed it and my family helped carry it to my BIG garden. I reconstructed it and have finished half of 1 end wall. I’ll finish the rest and we’ll put the plastic on tomorrow.
I just wanted to thank you for posting the plans for this super easy, inexpensive, and practical greenhouse. My seedlings will be happy to go from my germination chamber to the greenhouse and then into my high tunnels.
Cheers!
Michael Lobby
Great simple greenhouse design. Thank you for sharing this cost effective way for anyone to have their own greenhouse.
I like your website and will be checking out your other articles.
We’re gonna give this hoop house a go over the weekend. Thanks for putting this together and including an organizer material list, sure save us other folks the time. This seemed to be the most affordable and practical solution for us. Thanks!
Will the pVC bend correctly if a attach 2 10 footers together with a PVC union?
Kyle: That will work – however, I find that the top joint then becomes your weakest point and I’ve had a few snap on mine after a season. I would caution against that…
The only 3/4″ pipe I could find is called super pax. I tried it today, (20 ft. length)and it is not rigid enough, barely holding up its own weight! Anyone else having this problem? I did find pieces of PVC pipe in the Home Depot catalogue, but nothing over 10 ft. Any suggestions?
Brian: The pvc you want is quite rigid. You may want to try at your local plumbing supply store. I’ve had success at UFA and Co-op…
What may help keep the 3/4 inch tubing from getting brittle from the sun would be if you covered it with 3/4 inch insulation. But it will still get brittle over time.
Hello am gonna build your plan, but make it 12’x 16′. What size roll of poly would I need? Also if I shorten the width to 10′, will it make it taller with the same 20′ pvc pipes? Thank you
Gordan: I usually order my pvc 2ft greater than the dimensions. So I would order 14×18 for you. And yes, shorter widths = taller peaks!
That’s great work,pvc pipe is good,maybe fiberglass hoop for row cover is better instead,Fabric row covers are lightweight blankets made of spunbonded polypropylene which is sunlight, rain and air-permeable,maybe is better than plastic roll.
Some days ago,I bought 1/2″ fiberglass stake from AMAZON,one boss told me that long fiberglass stake use it as hoop,that is good,if someone like it,maybe you can try it,all right? Michael Lee
I bought some hoops from Amazon,at the same time,I bought some 3/8″ fiberglass stakes for supporting tomatoes,that is great!
if we build simple greenhouse,we would use corrugated fiberglass panel to build it,the strength is better than film.
Last time,one of friends recommend to use fiberglass hoope for the greenhouse,when I bought them and used them,found those are good,you like you may got to mrgarden.net to choose them.
Quick idea – if you screw the hoops to INSIDE of ground boards – NO stress on screws or brackets as hoops are pushing out against wood not bracket..
I would like to start transplants in March for early spring planting, but living in Southwestern Ontario we still have snow and freezing temperatures. Do you think a double poly with a fan in between work as well with this design? I would likely change the ends to plywood and insulate on the inside.
Lisa: Yes, that system should work well!
I’m VERY interested in building this greenhouse. Has anyone had any experience with this in heavy wind? I live in Florida and we get nasty storm almost daily with gusting wind over 30 mph. Just curious how it would hold up? I’d love to hear from you!
Scott: I think it would all come down to how well you fastened it down. The structure itself should hold up just fine. You’d just have to make sure that the plastic was very tight and that the entire structure was well attached to the ground!
Thanks a ton for the info.
Thank you so much for Sharing this, I saw under Facebook/ Survivorist Daily, I actually have a Small Greenhouse, and was destroyed last Night in a freak rain storm. I will be able to use yours and re-enforce what I have.. Thank you from Seattle
I am going to try this for a chicken run… using poultry netting instead of the poly.. so excited to see how it turns out!
Update: Our 16’x36′ hoophouse has been up for a year now. We did 3/4″ pvc over rebar in ground (18 down/30 up), with 2×4 end walls, baseboard is 1×8 cedar fencing secured with pipe straps, we did roll up sides about 30″ up and secured with pipe straps to 1×2 stripping. Purchased film from A.M. Leonard – great price, service and it’s held up well even through 80mph winds, wrapped pvc in duct tape to prevent pvc/plastic degradation. Hubby added 2x4s two uprights and one across secured to pvc with strapping every 12′ (uprights were cemented into ground to create a sort of door frame to help stabilize the structure. Worked out very well! Will probably do a 2×4 36″ stud wall with 12″ rebar drilled into 2x4s (6 in, 6 out) then add pvc with three ribs running lengthwise, secure plastic to toprail of studwall, so can roll up sides from below. will also add either deer fencing or chicken wire to stud wall to keep out critters – we did that with hoophouse. Hope this gives others some additional info! Go out and grow food!
Hi Francesca,
I’m planing to use Dave’s design with some small modifications. BTW Dave, your design is the best from hundreds I found on line.
I like the idea to open the sides over the very hot days and the extra support to the structure.
I will appreciate very much if you can send some pictures of your build. my email: nicolopicolo@gmail.com
Regards,
Nick,
Guelph, Ontario
I have a big front yard close to the road, every month, some car pass by here, my fence scratched a little ,so one of my friends told me that you got some driveway marker from mrgarden.net’s and inserted the land, something will be changed, so I hear what he said,then got it and put there, yeah,that’s a good idea.
Hello,
What a good job! Fine idea! I already had build some greenhouse nearly like this one when I was a child with my father.
I’m frenhspeaking, and I would like to traduce your article in French. May I translate it to French and edit the translation on my site? And I always name the original source, of course!!!
Thanks for sharing experience.
wow I love it going to build one in northern Michigan in the spring so I can grow food .thank you so much.ted
if i use the two layer s of plastic idea what type of fan and setup is necessary?
this is a great idea,, good as a store bought one,,and in some cases better,,am growing seabuckthorn plants from seed,,and cuttings,and this extra protection will be what is needed, thanks fron leadore idaho,,,,,
We are attempting this hoop house this week and will keep you posted! We live in the high interior of BC and often get high winds, so we will add strapping to the side. We are using the poly, but now after reading comments, will replace eventually with the woven poly. Didn’t realize the PVC pipe needs to be wrapped – if it is not, does anyone know how long it will last? One or two seasons? I like the idea of using 2×4’s to support the pipes in the winter months for the snow load! This plan only has a door – would that be enough venting in summer months if left open or would you recommend doors on either end? We usually only get into the mid 20’s for heat.
Christine: The white pvc doesn’t need to be wrapped. I’ve had my hoop house for 5 seasons now and just this winter, I had one pvc pipe snap under heavy snow load. I think if I had the 2×4 supporting them, there would be no problems at all! I have a door at each end of my 20′ house and that vents well enough. If you go longer, I think you may want other ventilation.
I must give you guy’s my applause, which doesn’t happen very often, I have been around this industry and the act of showing other’s how-to build greenhouses of all styles, not just hoop houses, and I would have to say that this is probably within the top 3, best hoop greenhouse construction guides that I have ever come across online, and I am well known for very in-depth research and sharing of that research.
So, I just wanted to drop a line by, and give you my compliment, and tell you that if you’d like to write for one of my companies many high traffic, high authority, guest authorship content networks, within our greenhouse and gardening website’s, we’d be happy to publish you’re work.
In addition, I would love to submit to you, a guide of my own, and I have several different unique how-to build greenhouse kits in styles, in which I have found no one else has done properly online yet, so it’s sure to be a hit. And, if you didn’t like it, then don’t publish it, but I would bet money on it, that you’re going to love my content and content distribution networks, all owned by myself and absolutely no spam.
Very nice to meet you, looking forward to talking about a further strategical alliance / relationship.
Thanks again, and have a great day.
– Whitney Segura (Founder and CMO at EarthCare Greenhouses)
We built the same hoop house (April 2014) for just under $400 in the interior, BC, CANADA. We get a lot of sun and a lot of wind here, so time will tell how it holds up. It was done from start to finish within a couple of days. We used Tuk Tape on the top of the PVC piping to avoid it breaking down with the plastic poly touching it. (Felt it was a quick insurance to have it possibly last a little longer) If the poly breaks down, we will re apply the woven poly to be stronger. We did use treated wood for the bottom frame to last a little longer. One thing I would highly recommend is to Tuk Tape over the metal banding to avoid it puncturing the poly. Some edges on the door framing seemed a little sharp so we Tuk Taped those sharp edges as well. With temperatures hovering around the freezing mark outside these days, I was pleased to see the temperature inside remain around the 80 degree mark! I’ve already transplanted what was in my original garden. Thank you for the plans! A garden at last!!!! I would post pix if I knew how…lol
We began construction of our greenhouse this evening. We modified the plans a bit but followed them for the most part. We were fortunate to get most of the lumber and the rebar donated but all things considered the cost would be in line with the article. If all goes well we hope to double our length by winter enclosing a compost bin and try to keep a few things producing until the bitter cold hits.
Thanks for the inspiration!
Awesome design and working to have this up by this fall.
Electrical supply store has 1/2 or one inch PVC tubing.
Did anione used the 1/2, around $0.4/ft.
Your reply would be very much aprecaieted.
I see lots of people building PVC tunnels. And I have built a few myself. PVC tunnels will not stand up to the wind or a snow load. I am not advocating johnnys select seeds however a metal hoop house will carry the load and you can buy a bender from Johnnys for 50 bucks or make one yourself. You can check out my facebook page for What a PVC hoop house looks like in the snow. If you are close to me in western Ky you can simply borrow my bender.I am building a metal hoop this season with heat. http://www.facebook.com/freetoyourtable I have also built small 6ft tunnels which their are pictures of also made from rebar and 2×4 wire worked very well under snow load.
Looked around but did not find a link or modified plan to build the greenhouse using 3/4 inch pvc. So I assume that 3/4 inch behaves identically to 1/2 inch in all regards and no updated link or plan is required. That right?
Have you read Elliot Coleman’s book Four Season Gardening? He uses this type of poly house but adds rows of smaller poly hoops over the plants in winter so he can grow greens and other cold resistant plants in the winter. Actually, more like preserve an adequate amount of these during the winter. Most of the growth takes place in the fall or spring. It’s great!
I would like to suggest a couple inch wide piece of plastic running along the greenhouse lengthwise from a couple feet up of ground to catch water, slopping the plastic piece just enough to deposit water into a container. This would save on water costs in the city when consumption is limited, or anywhere really.
It would be really cool to make the long middle pipe a sprinkler system. Seal up one end of it, put a hose adapter on the other end, and then drill holes for sprinkler heads into the pipe!
Want to see about using this hoop style for summer garden cover in southern Nevada where temps are pretty warm – thinking about shade cloth cover for summer due to open space and poly for winter where temps are not usually below about 26 degrees. What do you think? Might we be better off using]g a pergola style cover made of lumber?
I live in Austin Texas where it can get very hot, we used garden fabric and bamboo sticks to provide some shade but still allows the plant some light and air. It almost the end of December, and I still have all my plants from March.
Thank you for the way to have a hoop style greenhouse on a budget……for people like myself with multiple children on a budget that would like to get a headstart on their backyard gardens in climatic areas such as michigan where growing season is usually limited
What weight? on the pvc pipe
Thanks
Well I finally finished my Greenhouse.
I made mine 12′ X 20′ and I thought it would come in Under $400 due to less materials.
However, I just totaled it all up: $657.47 Plus $78.89 tax.
Now I do admit, I live on Vancouver Island where everything costs more than anywhere else in the already greedy B.C. (Bring Cash).
But aside from the shocking cost, the greenhouse is amazing! Now to load it up with great veggies and such.
Thanks for the great design!
No surprise that prices might vary greatly from 2008 to now.
It’s hard to imagine any level of the B.C. government could hold a candle to Alberta’s institutionalized greed.
(stumbled upon the article… good of the people involved to do such a good job in many regards.)
It’s been awhile now, how has it held up? And anything you would do different? I am vancouver island as well and hoping to build this design soon
Thank you for your insight
I built mine in 2011 and I’m replacing the ends this year. The plastic had been replaced twice, both times from Strom damage. I’m in Sooke on Vancouver Island
I live in Nelson, BC, but my bro is on the Island as well. I am looking to build a smaller GH, about 20ft. x 8ft. My 2 8×4 beds are in already. Last year only about half my tomatoes ripened b/c it was a cool summer. The year before was mucho better. I had a little 8×6 Canadian Tire GH in Kelowna and I put about 6 tomato plants in it and they produced until feb. with a small heater and a 4 ft grow light.
Hi Nathan,
I’m in Nanoose and about to start a 12×20. I am thinking about PVC or purchasing a car cover with metal frame. They are on sale right now for $300. Thanks for the info. Very helpful 🙂
Evita
Hey man I’m also Vancouver Island Port Alberni how long did your Greenhouse last and you take it down in the winter for the snow?