One of the most valuable assets in my garden is my greenhouse. It has allowed me to grow plants that I normally would not be able to grow, produce crops that the season is not usually long enough to produce, and protect my plants from frosts, hail, or other severe weather that normally would have destroyed my garden.
But I don’t have thousands of dollars to spend on a greenhouse. I just priced out an 8’x12’ greenhouse for $3,500. I would love to have a large, professional greenhouse, but that simply isn’t financially feasible for me. So, instead I’ve found a way to make a large greenhouse that is functional, easy to build, and inexpensive. This article will explain to you exactly how to build a 12’x32’ hoop-style greenhouse for under $400.
Required Materials List
Note: All wood should be green, treated wood to resist rot. (Or you can spend more money and buy a rot resistant type of lumber such as cedar.)
- (4) 2×6 – 16’
- (2) 2×6 – 12’
- (14) 2×4 – 12’
- (19) ¾” x 20’white pvc pipe
- (9) 10mm x 10’ rebar
- (1) 20’x50’ roll of 6mm plastic
- (1) Bundle of 50 4’ wood lathe (or optional staples)
- Zip ties
- Nails or screws
- Metal banding
- Door hinges and handles
Step 1 – Laying Out the Frame
Using the 2x6s, lay out and put together your 12’x32’ frame. (You can join the two 16’ pieces with a 2’ piece of 2×4.)
Ensure that the frame is square by measuring diagonally across it. You can temporarily keep the frame in place by pounding a 30” piece of rebar in each corner. (You can pull these out to use them in the next step.)
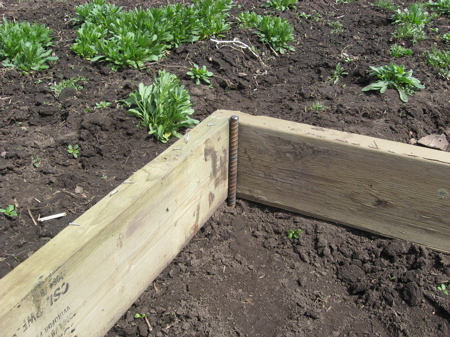
Step 2 – Adding the Hoops
Cut each 10’ piece of rebar into four 30” pieces of rebar. This will give you thirty-four pieces. Pound the rebar into the ground about 15” deep on the outside of your frame at two foot intervals. This will leave 15” sticking up out of the ground.
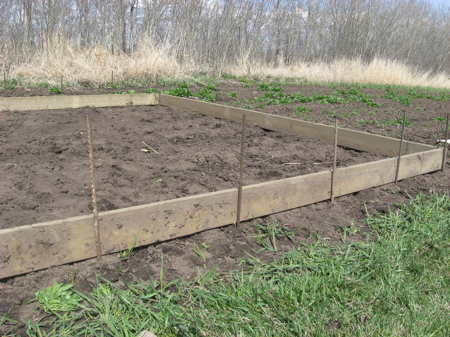
Now slide both ends of your pvc pipe over the rebar to make a hoop across the width of your greenhouse.
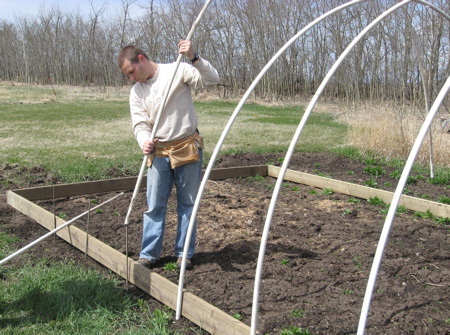
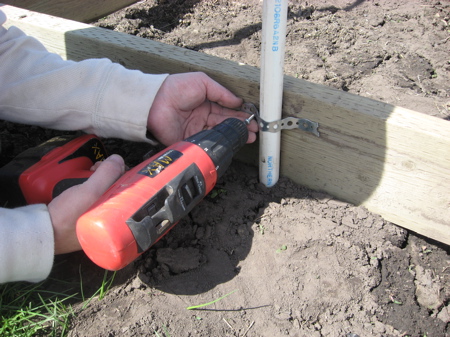
Attach the pvc pipe to the 2x6s by screwing short pieces of metal banding around the pipe.
Step 3 – Building the Ends
Cut the following pieces out of your 12’ 2x4s:
- (2) 11’8¾”
- (4) 1’6″
- (4) 4’7″
- (4) 5’7″
- (8) 1’11¼”
- (2) 4’¼”
For each end, assemble the wall according to the following diagram.
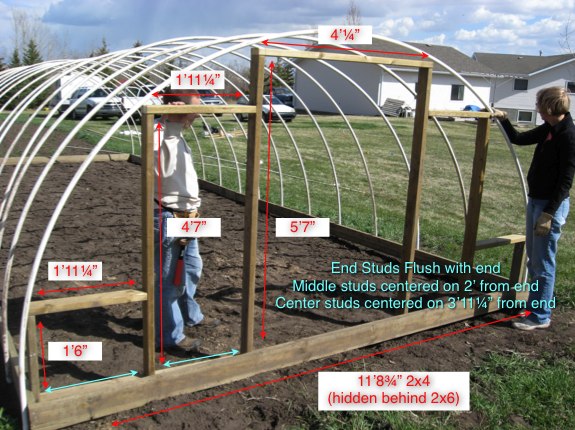
Place this wall within the 2×6 frame and nail/screw in place.
Cut (4) 28” 2×4 pieces. Cut one end at a 45º angle. Use these pieces to brace the wall.
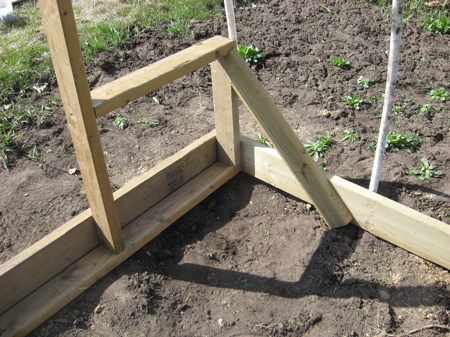
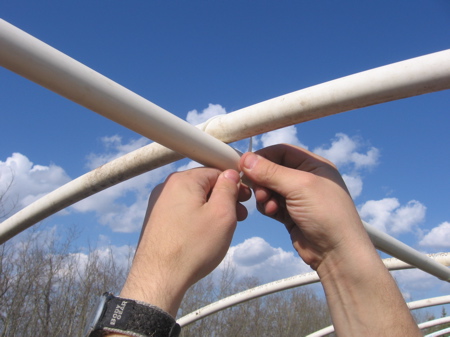
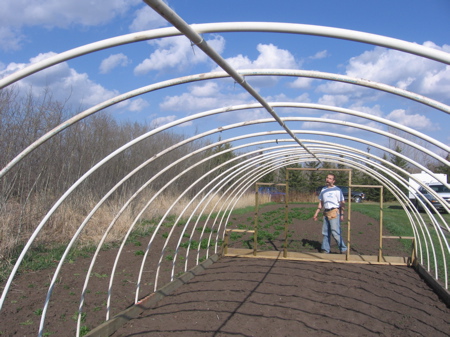
Once all of the hoops and the two ends are in place, connect two pvc pipes together and cut them to measure 32′ long. This will be the rib that will go along the top of your hoops. You can attach this rib with plastic zip ties.
Step 4 – Covering the Greenhouse with Plastic
If you are going to use wood lathe, cut 32 pieces of 20” lathe. These will secure the plastic to the sides of the 2×6 frame in between each hoop. Or optionally, you can use staples, though they may have a tendency to pull through the plastic.
Drape the plastic over the length of the greenhouse. Be sure to have enough overlap at the ends to cover the end walls. Pull the plastic snug and attach to the 2x6s at one end using the wood lathe or staples. Go to the other end, pull snug, and attach in a similar manner. Do this at the center, and then along the rest of the length of the greenhouse.
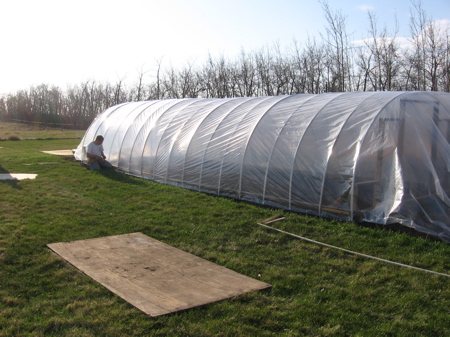
Note: If you can do this in warm weather, there will be less sagging later. Make it as snug as you can without causing damage to the plastic.
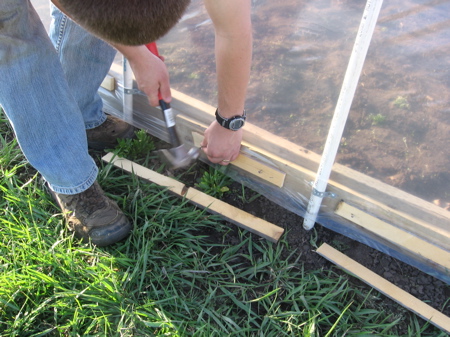
To attach the plastic to the ends, pull the plastic straight down, and attach with lathe. Then pull the plastic out to the sides. This will give you extra plastic along the outside edge. Fold the plastic back towards the center and attach. For the end with the door, cut out the plastic leaving a few inches of over hang to wrap inside and attach.
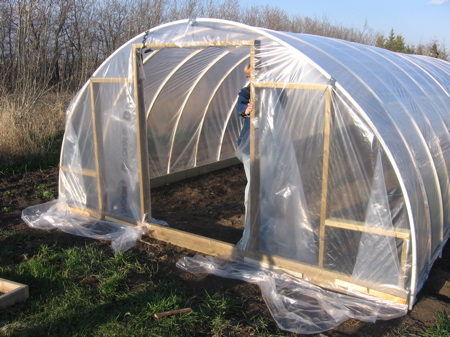
Step 5 – Adding the Door
Before you cut your pieces, check the actual measurements for the space you have. Your wall may sit a little different than mine. It’s always better to go a little small or your door may not fit. But if the measurements are the same, cut the following pieces out of your 12’ 2x4s:
- (2) 4’11”
- (2) 3’9″
Nail these together to make your door frame. Lay a 2×4 diagonally across the frame and nail in place. Trim off anything that hangs over the frame of the door. This will be on the inside of your door. Too much wood hanging over will jam your door. Attach the hinges to the door frame.
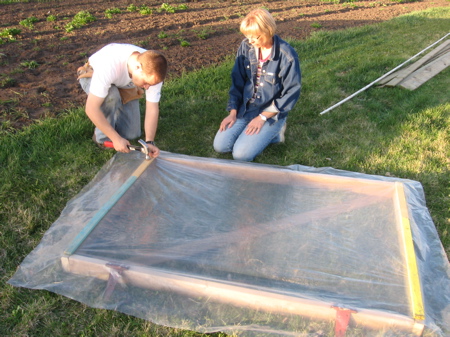
Cover the outside of the door with remaining plastic or you can use plywood if you would rather. You can attach the plastic with the wood lathe or staples. There should be about 4” of overhang of plastic on all sides.
Attach the door handles to the door. Mount the door to the frame.
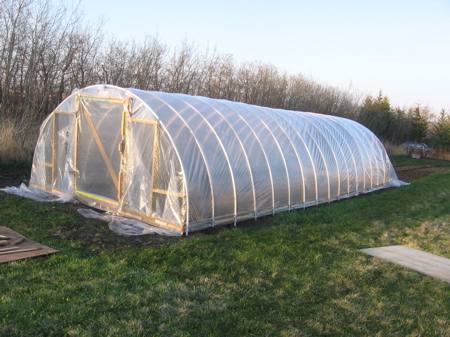
And there you go! You can have a beautiful 12’x32’ hoop-style greenhouse that can be built in a weekend and all for less than $400.
——
Update: July 11th, 2008
To see just how well this greenhouse works, see my July Greenhouse Update.
Update August 5, 2009
For an new and improved version, see An Inexpensive, Hail Proof, PVC Pipe Greenhouse.
Update November 29, 2010
Improved design. Changed material list from half inch PVC to three-quarter inch PVC.
456 replies on “How to Build an Inexpensive Hoop-Style Greenhouse”
My husband built me a greenhouse (lucky me!!) It is approximately 12×10
He cut piping into one inch to clip the plastic together. At the end there is two 6ml pieces of plastic connected to the 1/2 inch PCV. It is very windy today and the clips are slipping.
Also, he attached two boards to the plastic at the bottom of the sides but the wind is getting in. .
He did not secure the PCV pipes with rebar. They are just put in the ground about 1 foot.
We are in Nova Scotia so it is quite windy.
Suggestions would be appreciated.
[img]https://www.albertahomegardening.com/wp-content/uploads/2011/10/057.JPG[/img]
[img]https://www.albertahomegardening.com/wp-content/uploads/2011/10/058.JPG[/img]
[img]https://www.albertahomegardening.com/wp-content/uploads/2011/10/056.JPG[/img]
Update…
We had a major wind and rain storm last night. The ends survived the storm but the top blew off dispite the boards secured to the bottom and the clips blew into the air..
My husband screwed on the clips but he thinks that they might put a hole in the plastic under strain of snow or rain.
Any suggestions…
Cindi: You really need to something solid to nail/screw/somehow attach the plastic to. I have a wooden base and wooden ends so that I can nail my plastic directly to that. And with that, when you are attaching your plastic, don’t just put the nail directly through the plastic – the nail head will rip right through. You need more surface area – I’ve used thin strips of wood or plastic to nail through (See step #4 of the above article.)
Try allowing for ventilation throughout the greenhouse so that pressure does not build up inside during a wind storm.
Why do you need the wood base for the greehouse?
could something else be used? what is its importance/
Harry: I use the wood base for two things: #1. It gives me something to attach the plastic to at the bottom. #2. I use it to support my wooden ends. (for bracing)
Thanks
if anyones on here today all the best to yous for 2012
alf
This is exactly what we where looking for, thanks.
Just started my hoop house today pictures to follow
Thanks so much for taking the time to post pictures along a detailed description on how to build the greenhouse. We are in the process of building a greenhouse and using your plans. I have a question about the door. It’s a little hard to see in the picture, but did you place the door directly inside the door frame? Or did you make it where the door sits on the outside of the frame? Thanks!
Nex: Yes, the frame is within the door frame.
wow…I have been thinking to build one but don’t know what to do. This is a great guide! Thanks! One question, I live in Nova Scotia. It can be windy and snowy. Do you have experience how much snow or wind this structure can stand? Again thanks so much!
Ning: Wind doesn’t seem to be a problem as long as you have your poly attached well. Heavy, wet snow can be an issue. With this structure, I’ve had the roof bowing very low – although nothing broke. But you probably would need to either support the middle to prevent cave-ins, or be very faithful in cleaning off any heavy snow.
This is exactly what I was looking for. Thanks for being so unselfish and helpful to other.
May God bless you.
ES
Ok cool. So I will add a few posts in the middle. Yes wet snow is indeed bad. It crashed my blueberry net and posts last winter when I was too lazy to remove the roof off thinking the net was so thin and won’t catch the snow…just want to say thanks again and I will tackle it this summer…man…cannot wait.
I like your design, but is there an option to toxic pressure treated lumber for the base other than cedar? I’ve used borate treated posts before, but I’ve heard it doesn’t work well in outdoor applications or in contact with soil.
Brad: Sure! You can even use normal spruce lumber – I should think the wood will last at least as long as the plastic. (And its much cheaper than treated or cedar – so you can afford to replace it more often!) Or as a more expensive option, there is the composite wood they use for decking – that should work too.
I built a greenhouse to your specs last fall. Our weather here in Western North Carolina is not quite as bad as farther north. I changed the plans to a smaller size (12′ x 24″)to use the available cleared space in my yard but used the same number of rebars and pvc pipes as for the larger size for additional strength for our high mountain winds. I added 24′ pieces horizontally on each side half way between the wood and the roof line for additional stability. These pieces are attached to the vertical pvc pipes with wire ties and makes a great place to hang flower baskets. I added a 24′ piece of 3/4″ pvc on top of the vertical pvc for a roof line ridge to help shake off the snow. The two African spur tortoises love wandering around inside on nice days! And when it’s very cold at night, a small heater keeps the inside just warm enough. This spring I’ll build a smaller one for the chickens. Thanks for the great plans!
How exactly did you “attach the horizontal pieces on each side halfway down” so it doesn’t slide down?
do you use this in the winter or just extend your growing season buy a few extra months, and if so, do you add any additional heat? Bye the way it looks really simple and neat, may try one this summer.
Personally, I just extend my season a bit. I might add a small electric heater for a few of the colder nights in late summer. We quite often get an early frost and then another few weeks of warm weather before the cold sets in.
Nice work guys! I built my first dome for our above ground swimming pool using rebar and piping. I remove the plastic cover every fall and its been heating our pool and keeping it clean for the past 6 years now!! Take care.
Just the guide I’m looking for!
My father wants to build one and we’ll use this plan!
I just have some questions,
We live in the Philippines where the climate is tropical,
when summer it is very hot and sometimes rainy, sometimes, the rains are strong and also the wind. Can this work for us?
Patrick – I see no reason why it wouldn’t work for you in your climate. I think the key would be to make sure your plastic covering is strong enough and kept tight. (Sagging plastic will quickly cause problems.)
My husband and I bought 6 mil clear plastic for our greenhouse. When we opened it the plastic seemed more white than clear, it is see through and light does penetrate but not as much as I had pictured in my mind. I wonder could it be because it’s just higher mil plastic. We did get it from home depot and not from a gardening supply company.
Im building a hoop greenhouse 14mm. 15foot long x 14foot wide.3/4pvc hoops.I was thinking for winter [i live in ct] that I would build another green house AROUND this one.So this one would be INSIDE the new green house,it would have 12inches of air space between the two palstic’s. Im trying to think of how much heat would be needed for the inside one to grow will say tomatoes ,Out-side temp say night time30 deg.F. day time 40deg F. It would be lol a thermopain green house.
Yes the front and back would also have the 12 inch air space.So you would have to walk through 2 doors.also.
John
Thanks for these plans.I am building my first greenhouse for my first aquaponics system here in Tennessee.Wish me luck….Have a Blessed day
great read and site! I too am looking at building something like this. Just curious, now that is has been awhile.. how’d it do with winds etc?
Dan: So far, the winds haven’t been a problem. As long as you have decent poly to begin with and keep it tight (it’s the flapping that kills it) – it should last a long time.
First: Dave, you’re awesome, thank you so much for this guide.
Second: I have a pecan tree very nearby the area I’d like to build my greenhouse. Any idea how resilient the plastic is to small-medium size twigs falling from trees?
Tony: Thanks for the kind words! If you’re going to have all kinds of twigs and small branches raining on your greenhouse, I’d sure recommend a heavier poly. I’m not sure where you’re from, but if you’re from Canada or the U.S., you can get some good 11 mil woven poly from northerngreenhouse.com. I think that 11 mil stuff would withstand all but very large branches.
So excited! Thank you. Will see how this works in Utah. And I love the idea of doing this for a school, as someone suggested.
Is their a reason why the pipe is placed outside the wood framing at the base? Would it work better inside the frame allowing you a flat area to secure the plastic the entire lenght of the greenhouse. You could use say a 1″ x 1″ the whole way down getting a great seal from wind and cold air.
John: Actually, that is one of the changes that I’ve made to my design since I published this. You can see this and a few other changes here…
Starting my greenhouse today! I’m very excited, but I think I may need to start another next week. Lol.
I need to build one for a 42×30 spot, i love the design and would like to adjust it for this dimention, but not really sure how much pvc pipe i would need in order to do this.
Peter: I’m not sure the PVC would be strong enough for such a large span. I might suggest an A-Frame style greenhouse – like the one here – http://www.northerngreenhouse.com/ideas/how_to/aframe.htm
Thanks a bunch!! I decided to do a cold frame on the 11 raised beds we have at the spot, but will definitely will keep that in mind when we build on the farm plot (have 5 acres separate from the house)
Great article and pics, very useful. I am going to link this article to my website, all of our readers are avid gardeners.
Thanks so very much for sharing your detailed plans for building this! Looks fantastic! Just one question – as I am a complete amateur when it comes to this – I was looking for the PVC pipe online, and I have no idea which type to choose among those being offered – “40 schedule”, “80 schedule” – what does this all mean? One place I contacted also told me they thought the PVC would crack when being bent into a hoop shape! Obviously yours didn’t, so I’d appreciate specs on exactly what type of PVC to buy. Thanks so much!
Agnes: I’m no plumber, but I understand the “80 schedule” is a thicker walled pipe compared to the “40 schedule”. I have used “40” in my construction.
Love the design and am planning on building for myself. I was thinking of putting two rows of chicken boxes on the north side of the hoop house. I would use the chicken boxes in place of the 2×6 and re-rod to mount the hoops. I see a couple advantages in this. 1. the chickens would provide heat. 2 the greenhouse would have more useable space (wouldn’t need to be on my knees as much near the edges 3. More area would be exposed to the south light ??? (the hoop house would be “cocked” to the south)
The main thing I am worried about is racoons etc getting at my chickens before the puppy i buy to protect them grows up thus loosing my investment in chickens, dog (maybe), and plastic.
What do you think?
Dunn: Sounds great. We don’t have racoons around here, so I can’t speak to that specifically. Any one else with experience on racoons?
Hi – I’m located in Ciudad Quesada Costa Rica My elevation is about 3000′. The winds get very strong where I am located. Maybe 30 – 40 knt gusts. Do you think this design will withstand that? Anyone have any experience with strong winds?
Many thanks
Mark: We occasionally get gusts like that here too. My brother uses a similar design at his u-pick farm with no problems and he gets LOTS of strong winds.
Where did you get the 20′ tubing I can only find 12′
Thank you in advance and thank you for publishing your plans.
Vince: I believe I bought my 20′ pvc at UFA. I also believe Home Depot and Co-op carried it as well at the time.
This greenhouse is great and simple to make! I used plastic from http://www.northerngreenhousesales.ca …they sell 11 mil plastic for a great price! 🙂
Great Instructions!! How have the PVC pipes held up since you built it? I noticed a previous post talking about them becoming brittle over a couple of years. Any issues with breakage or weakness?
Also, do you still have your massive A frame hoop house that I noticed on another page? How is that working out.
Thanks!
Brady: These pipes are still going strong! The 10′ pipes that I joined at the top (in a previous structure) did snap right at the joint after a couple of years – but these 20′ ones have no problems so far. As to the A-Frame, I’ve since moved from the acreage to a town lot, so my space is much less! But if I have the space again someday, I will certainly be looking at building another A-Frame.
Hey Dave love your design.My wife is wanting a greenhouse bad were she can save her summer plants,pool plants & ferns plus grow some herbs. So I was thinking about buying one but I ran across your site and loved it.I live in North Georgia were in the winter sometimes it will dip in the low teens but not for a long time.Will I be able to put a heater in during the winter months to keep the plants alive plus is it pretty air tight?
Thanks
Tony: For sure you can put a heater in your greenhouse – it’s pretty air tight, but alot depends on your construction – particularly the doors.
Nice instructions. I have a little rag-tail hoop house, my first. It will do for this year but I want to build one like yours for the winter. Mine is like yours but not as finished and not as sturdy, but it will do for now. It’s also a lot smaller but it’s sufficient!
Dave, thanks a million for these instructions. I live in North Vancouver and just priced out the materials today (20 April 2012), thought I’d share my knowledge in case anyone else in my area is looking to do this project. I was just wondering, though, why you felt it worked better to do plywood ends than poly film? Was it mostly because of strong winds / weather in your climate?
And in terms of sharing other local info, I was initially inspired by this amazing North Van group who (among other things) built a community farm, including a hoop house, to share produce with those who need it (http://www.ediblegardenproject.com/what-we-do/loutet-farm/). I’ll probably have more space in my hoop house than I can use, so I’ll be donating my extra space / extra produce to the Edible Garden Project!
(One of my objectives in sourcing materials was to avoid Home Despot ’cause I always regret going there – based on their website they didn’t really have most of this stuff anyway).
Lumber, 20′ PVC pipe, rebar: Best prices (and friendliest staff!) I found were with Standard Building Supplies (others have slightly better lumber prices, but this was the only place I found 20′ pipe, most only have 10′. $13.50 for 3/4″ x 20′). Multiple locations around the Lower Mainland, open M-Sa (including one right down the street from my house, so I don’t have to drive on the highway with 20′ of PVC pipe flying off the car…).
6 mil UV poly: (I’d love to buy 11 mil woven from Northern Greenhouse but I don’t think I can quite afford it yet!) False Creek Industries, 8811 Laurel St. in Vancouver, 604.324.4311, open M-F. They sell multiple widths in full 100′ rolls, but will cut their 20′ width to any length at $3.50/foot.
For my planned 11′ x 19′ hoop house, cost of supplies is nicely under $500, unless I splurge on cedar in which case it’s about $150 more (yikes!).
Does anyone have experience with the “polyfastener” from Northern Greenhouse? That does seem like it would be a good investment: looks like it would greatly simplify the process of attaching the poly film, and I could continue using it once I eventually upgrade to 11mil woven poly. It does cost less than splurging on cedar…
Thanks again for sharing these plans & your experience!
I ended up finding polychannel (similar function to “polyfastener” sold by Northern Greenhouse, but it’s an aluminum channel with flexible wire to hold the poly-film in place) and another source to purchase 6mm UV polyfilm: Slip Tube Greenhouses in Surrey, BC. The polychannel is $1.65/ft (it comes in 10′ lengths – important to know if you’re picking it up in a car… it *just* fit inside our station wagon without having to bungee the trunk). It was expensive, but made it SO easy to attach the polyfilm to the wood frame – and it will be nice when we eventually need to replace the film, or if it starts sagging and we need to tighten it. Pix of my new 11′ x 19′ hoop house are here: http://goo.gl/lVfcP
Teagirl: Great pictures! Thanks for sharing! And good info about that polychannel…
Hi, teagirl, thanks for putting local info to help others, I am in Coquitlam, I want build a greenhouse without spending much. I plan to build a 8 x 23 one, and I have a side wall about 3′, so I plan to use 10′ 1/2 pvc. But when I checked the info you provide, it seems yours are much expensive.
For 10′ pvc, I can get for $2.?? a piece, for the poly film, about $29 per 500 square foot. Those are price in HD, I don’t like HD either since their products are very pricey, but I don’t have other sources.
If I go for the materials in your list, UV poly is $3.50/foot, that will be $87.5 for 500 square foot, that is much expensive, I think that is close to price of the 11 mil Northern Greenhouse Sales provides, price like below:
500 sq.ft. to 1999 sq.ft. $0.34 – Standard Widths and Custom Widths. Not sure what you thought there.
seems I made a mistake here, the price of Northern Greenhouse is still double than the one you bought. Have you found more useful info later?
Where did you find the 25′ X 50′ Clear Plastic Sheeting that was actually that size and actually clear?
I didn’t see one answer question about the clear sheet, from what I saw in HD, vapor barrier in different size has different transparent, some are almost in white.
Can somebody please explain what measurements are used here?
Love reading all the great comments, and of course the wonderful instructions for building the greenhouse. Here’s my question…I am just starting out as a gardener, and wanted to have space to start seedlings in the late winter, and i don’t have the space inside my house. Would this type of greenhouse be what I would want to build? I see that it is built right on/in the soil, so maybe I would build a floor for mine, to have tables or shelves. ???? I’m also in Nova Scotia, and i can’t see it holding up in over the winter. Any advice? Thanks!
Miranda: This greenhouse could work for you – but there are a lot of variables. This greenhouse was mainly designed for extending the short Canadian growing season. That is, to keep things warm enough so they don’t freeze. To start seedlings, you need to have a much warmer environment. Now, depending on how much you want to pay for heat, this structure could work. You would probably want to seal the doors and maybe even insultate the wooden ends to improve efficiency. Also your idea to make some tables inside would probably be a good one. As to the Nova Scotia winters, it’s been done! Read this post! Hopefully that helps you make your decision.
How do bees polinate the plants?
Tripp: I usually keep both of my doors open during the summer months – so it’s no problem for the bees to come in and do their business.
Oh okay thank you.
I’m 6′ 4″ tall. Would this greenhouse be tall enough for me to comfortably work in it? If not, could I make this design slightly taller by using longer PVC pipes?
Thanks.
Harry: 6’4″ would be pretty tight I think. Probably the easiest fix is just to make it slightly narrower – that’ll push the peak up.
Dave,
I’m so glad to have stumbled upon your blog! We’ve been trying to grow tomatoes and peppers every year only to have it destroyed by our harsh Alberta weather. We always knew that we wanted to build a greenhouse but really balked at the price…until we found your design! It was so simple, inexpensive and effective. We were able to put up our greenhouse in a day! We’re really looking forward to having our plants live through the summer this year!
Thank you!
Thanks for the idea! 🙂
We bulid our greenhouse of 4 inch pvc pipes (we got them free from a djunkyard), and we put the pipes inside the bottom frame so that the plastic can be put around the outside of the frame without interruption.
We used wood in long length to secure the plastic and it make it stronger and the wind cannot come inside.
We payed about 85 dollar for a greenhouse which is approx. half the size that you build….
Q: CAN I PLANT TOMATOES THERE?
Passy: Yes, you can!
Hi Dave
Your article and subsequent answers to questions have been a great help – thanks a bunch. One quick question – is the PVC you used 3/4 inch (20mm) internal diameter, or external? From the photos it looks like it’s probably 3/4 inch internally, with an outside diameter of about one inch (25mm). What is the wall thickness, do you know?
Thanks
Ross: I’m not entirely sure. I just went by what the hardware store said!
It is worth it to find the right plastic. I built a greenhouse using greenhouse plastic. If you put the keywords “4 year” in a search for plastic, you will easily find 6 mil plastic that is guaranteed for 4 years, and can easily last 8 if properly cared for (washed once or twice a year in and out). It lets in almost all the UV, and is pretty tough. I used a tarp-covered metal carport frame (left standing after the original tarp gave out). The plastic is held on with aluminum channel (secured to frame ends with self-tapping screws) and wiggle wire, and some wood framing for the ends, and an old screen door for access. When I replace it (it is about 4 years old now, but looks like it has quite a bit of life yet), I will add the feature of “dripless” to my new plastic, a new feature that is supposed to make the condensation on the roof run down the sides, instead of dripping on your plants. Some plants do not like to stay wet on the top. Grow on!
Thank you for this idea, with a few modifications it perfect for my parrots out door flight “cage”. We plan to connect one end to the house (using sliing glass doors the entrance so they can go in and out. Can someone please tell me how to make this longer to 40 to 50 feet and stronger?? there will not be plastic to covering only 3/4 netting. ANY advise would be appiciated greatly. thanks
Thanks for the instruction- I am loving my hoop greenhouse creation. I’m just wondering if I should take it down during the winter, do you think the PVC pipes will be okay? Would they freeze and crack or snap with snowload? I live in Terrace, northwestern BC.
Rose: The PVC becomes quite brittle with age – I’ve found it best not to move them! I leave mine up all year round. With the greater snowload that you have, I might be tempted to take the poly off (leaving the PVC pipes in place).
Thanks for the advise – much appreciated Dave :0)
Howdy! We are in the process of building our pvc hoop house, but one thing is not addressed in anything that I read and that is the fact that the the 6ml 4yr poly everyone refers to cannot be in contact with pvc as it will degrade rapidly. What have you done, if anything, to address this? I’m thinking just painting with primer as a block between the two plastics and their chemical reactions. Have you noticed any degradation? I’m looking at purchasing Tufflite IV 6ml film. Let me know. Frame is up but as it is so hot right now we are putting up shade vs. plastic so won’t add plastic until late September.
Francesca: The poly that I’m currently using (11ml woven poly) has shown no signs of degradation where it contacts the pvc. But your idea is a good one – a white primer would be effective.
I wrapped the pvc w duck tape. I had it up for two years w no problems
I have read to use tape. I don’t know what type but suppose it should be waterproof.
How does this greenhouse hold up over the winter? What is winter like there?
Snow load is the only problem I’ve had. Most of our snows are pretty dry – but when we get wet, heavy snow, the pvc pipes begin to sag under the weight.
I had one similar in the Cariboo area of B.C. Plastic lasted 4 years though it did stretch. For snowload, in the winter I placed 2X 4’s upright to support the hoops. Just stood them up. The one thing I would do differently is provide for ventilation. These babies heat up. Stick a fan in the end or allow for rolling up the sides.