One of the most valuable assets in my garden is my greenhouse. It has allowed me to grow plants that I normally would not be able to grow, produce crops that the season is not usually long enough to produce, and protect my plants from frosts, hail, or other severe weather that normally would have destroyed my garden.
But I don’t have thousands of dollars to spend on a greenhouse. I just priced out an 8’x12’ greenhouse for $3,500. I would love to have a large, professional greenhouse, but that simply isn’t financially feasible for me. So, instead I’ve found a way to make a large greenhouse that is functional, easy to build, and inexpensive. This article will explain to you exactly how to build a 12’x32’ hoop-style greenhouse for under $400.
Required Materials List
Note: All wood should be green, treated wood to resist rot. (Or you can spend more money and buy a rot resistant type of lumber such as cedar.)
- (4) 2×6 – 16’
- (2) 2×6 – 12’
- (14) 2×4 – 12’
- (19) ¾” x 20’white pvc pipe
- (9) 10mm x 10’ rebar
- (1) 20’x50’ roll of 6mm plastic
- (1) Bundle of 50 4’ wood lathe (or optional staples)
- Zip ties
- Nails or screws
- Metal banding
- Door hinges and handles
Step 1 – Laying Out the Frame
Using the 2x6s, lay out and put together your 12’x32’ frame. (You can join the two 16’ pieces with a 2’ piece of 2×4.)
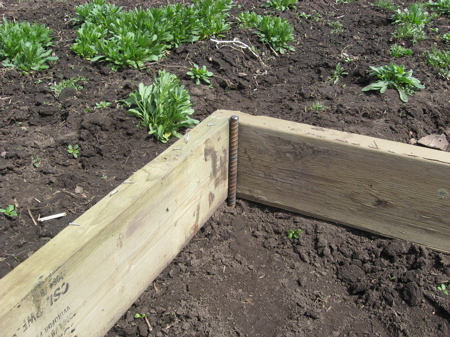
Ensure that the frame is square by measuring diagonally across it. You can temporarily keep the frame in place by pounding a 30” piece of rebar in each corner. (You can pull these out to use them in the next step.)
Step 2 – Adding the Hoops
Cut each 10’ piece of rebar into four 30” pieces of rebar. This will give you thirty-four pieces. Pound the rebar into the ground about 15” deep on the outside of your frame at two foot intervals. This will leave 15” sticking up out of the ground.
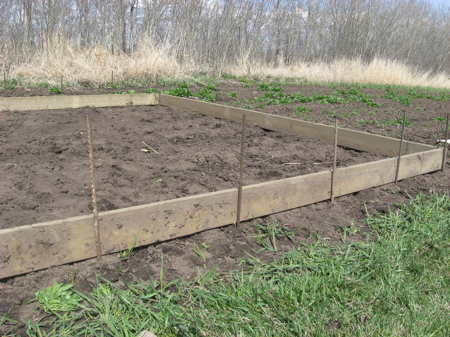
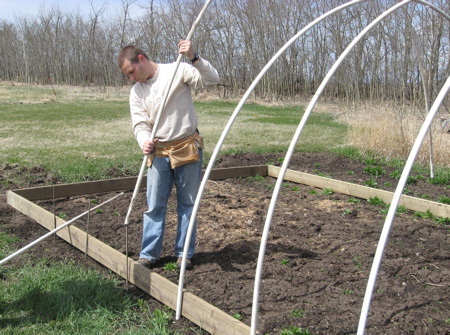
Now slide both ends of your pvc pipe over the rebar to make a hoop across the width of your greenhouse.
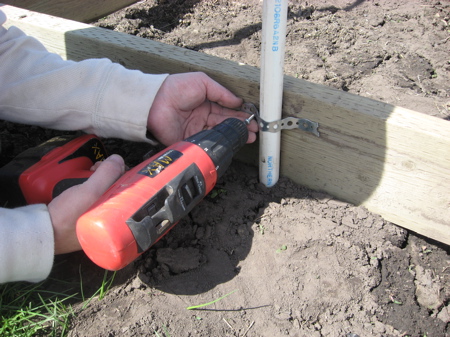
Attach the pvc pipe to the 2x6s by screwing short pieces of metal banding around the pipe.
Step 3 – Building the Ends
Cut the following pieces out of your 12’ 2x4s:
- (2) 11’8¾”
- (4) 1’6″
- (4) 4’7″
- (4) 5’7″
- (8) 1’11¼”
- (2) 4’¼”
For each end, assemble the wall according to the following diagram.
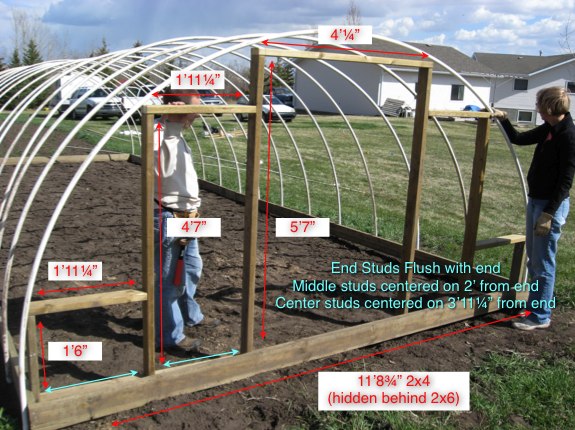
Place this wall within the 2×6 frame and nail/screw in place.
Cut (4) 28” 2×4 pieces. Cut one end at a 45º angle. Use these pieces to brace the wall.
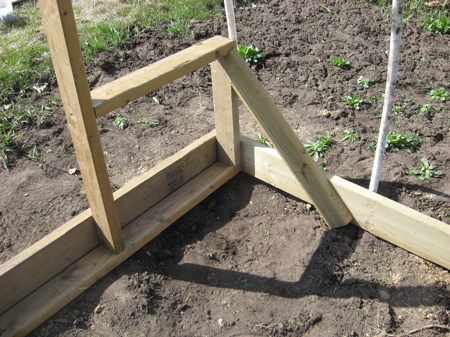
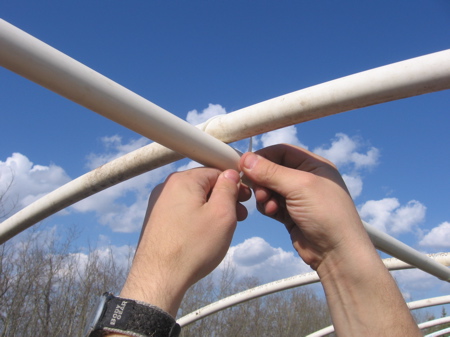
Once all of the hoops and the two ends are in place, connect two pvc pipes together and cut them to measure 32′ long. This will be the rib that will go along the top of your hoops. You can attach this rib with plastic zip ties.
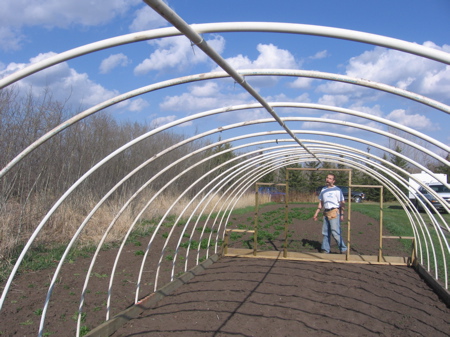
Step 4 – Covering the Greenhouse with Plastic
If you are going to use wood lathe, cut 32 pieces of 20” lathe. These will secure the plastic to the sides of the 2×6 frame in between each hoop. Or optionally, you can use staples, though they may have a tendency to pull through the plastic.
Drape the plastic over the length of the greenhouse. Be sure to have enough overlap at the ends to cover the end walls. Pull the plastic snug and attach to the 2x6s at one end using the wood lathe or staples. Go to the other end, pull snug, and attach in a similar manner. Do this at the center, and then along the rest of the length of the greenhouse.
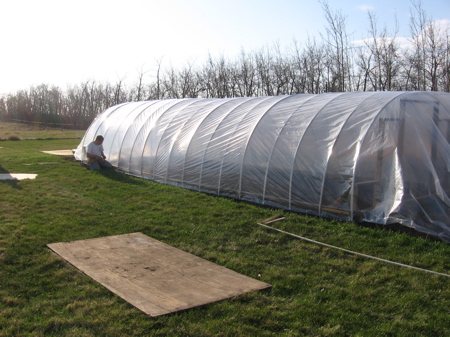
Note: If you can do this in warm weather, there will be less sagging later. Make it as snug as you can without causing damage to the plastic.
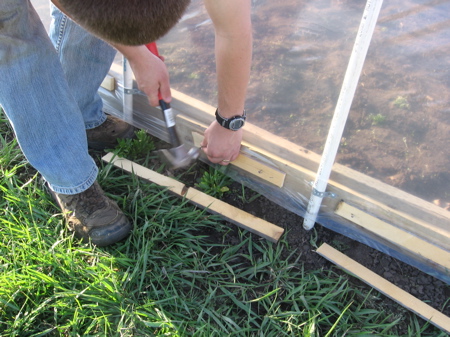
To attach the plastic to the ends, pull the plastic straight down, and attach with lathe. Then pull the plastic out to the sides. This will give you extra plastic along the outside edge. Fold the plastic back towards the center and attach. For the end with the door, cut out the plastic leaving a few inches of over hang to wrap inside and attach.
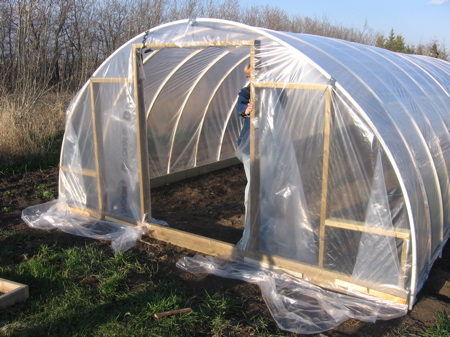
Step 5 – Adding the Door
Before you cut your pieces, check the actual measurements for the space you have. Your wall may sit a little different than mine. It’s always better to go a little small or your door may not fit. But if the measurements are the same, cut the following pieces out of your 12’ 2x4s:
- (2) 4’11”
- (2) 3’9″
Nail these together to make your door frame. Lay a 2×4 diagonally across the frame and nail in place. Trim off anything that hangs over the frame of the door. This will be on the inside of your door. Too much wood hanging over will jam your door. Attach the hinges to the door frame.
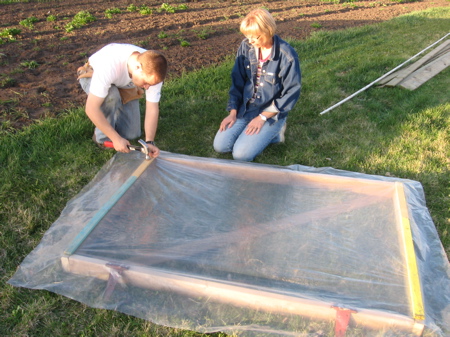
Cover the outside of the door with remaining plastic or you can use plywood if you would rather. You can attach the plastic with the wood lathe or staples. There should be about 4” of overhang of plastic on all sides.
Attach the door handles to the door. Mount the door to the frame.
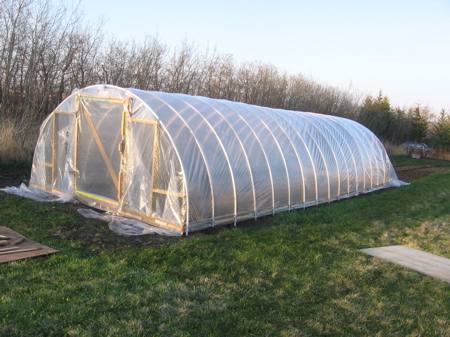
And there you go! You can have a beautiful 12’x32’ hoop-style greenhouse that can be built in a weekend and all for less than $400.
——
Update: July 11th, 2008
To see just how well this greenhouse works, see my July Greenhouse Update.
Update August 5, 2009
For an new and improved version, see An Inexpensive, Hail Proof, PVC Pipe Greenhouse.
Update November 29, 2010
Improved design. Changed material list from half inch PVC to three-quarter inch PVC.
456 replies on “How to Build an Inexpensive Hoop-Style Greenhouse”
Your blog is becoming one of my favorites…fast! Thank you so very much! Keep blogging!
I’m glad you like! Blog I shall!
You’ve put up a fantastic tutorial here – very, very tempting!
wind ever take it for a ride?? and have you found an easy way to attach a ventilation system
The rebar does a great job of keeping it put. I’ve never had a problem with wind. The only ventilation I’ve used is to either replace the plastic on the door with screen or leave the door open. For the majority of the summer, you can just leave both ends open – closing them for the night when there is a risk of frost.
This is the best set of directions and the most clever design. I thank you very much, my hollyhocks and cantelope may have a chance in Fairbanks, AK this year!
Great design! How about snow? I want to build a greenhouse over my garden and I live in northern Wisconsin where we get lots of snow…
Well, I haven’t tried it with 6 mil plastic over the winter, but the 10 mil plastic I had on another greenhouse of similar design did just fine. The snow just slides off. The only concern might be if it piled up too high on the sides and started to push in your walls. But I never had a problem.
Super design! I also live in Alberta and we are planning on building a greenhouse in the next few weeks, or at least we are now. If I may ask, where did you buy your plastic?
This plastic was bought at Rona for just under $100. If you do build a greenhouse, I’d love to see some pictures!
Unbelievable! I’ve been to hundreds of webpages trying to find some way to build my own greenhouse that seemed like it would be simple, inexpensive and really work. I can’t tell you how grateful I am for your great description, instructions and pictures here that make it easy to follow. I live in a windy area, so I’m a little concerned about it holding up, but it looks like this design is the best for the wind to just ‘blow right over’! Does this really work throughout the whole winter? Even if it got through most of the year, it’s still going to be a huge blessing. Thanks for sharing this with the world wide web!
Blessings,
Angela
Structurally, this greenhouse should have no problem making it through the winter – the only issue could be your plastic. Six mil plastic might be a little thin to leave on all winter, but 10 – 12 mil should be just fine.
Great job Dave. I was just wondering could you not space the pipes 3′ or 4′ apart instead of 2′ apart? Also would it be easier to put the plastic on by digging a trench at each side and when you backfill the trench it will stretch the plastic?
You might try 3′ or 4′ spacing, especially if you plan on taking the plastic off for the winter. Otherwise, depending on your snow fall, you might end up with a saggy roof in winter.
The trench idea might work too. You’ll have to give it a try and let me know how it works!
How would you heat this greenhouse if you lived in northern mississippi. The winters here have been very mild the past couple of years. We do get down into the teens occasionally, snow maybe once a year that barely covers the ground. I’ve read where you could fill milk jugs or barrels with water and paint the container black so it would absorb heat, just looking for inexpensive way to heat. Any ideas. Thanks.
Hmmm… that’s hard for me to imagine. Most of my winters hit at least -35 or -40! Barrels of water might work – it depends how warm you need to keep it. In the greenhouse above you would probably want several barrels of water to keep it a few degrees warmer than outside. Anything more and you’d probably need to look at some artificial heat – electric, gas, coal, wood, whatever is available in your area.
Fantastic! Bravo!
I read about how some people dig down a foot and lay down styrofoam board then sand with a heat mat in the sand…soil is last.
Regardless, your project as presented is GREAT!
Just a few tips for anyone who’s interested.
6 mil poly is stong enough for any winter if it’s greenhouse poly not vapour barrier. For anyone who wants to heat it they should go with a double layer of poly and inflate them with a little bathroom fan or furnace fan. You want a 6-10″ air space between the 2 layers this air space acts as isulation and greatly reduces condensation. I would also suggest putting the 2×6 on the outside of the pvc pipe this way you can get a tight seal down the full length of the building. You would also need a tight seal on the ends, this might require the use of a wirelock system or plywood ends. The 2 layers both go on the outside 1 on top of the other and the fan separates them and gives you your insulation. Also if you have a choice you should face the building east west so you get maximum sunlight in the spring when you need it most, this will also make it easier to vent in the warmer months. Sorry for being so long winded! Good luck.
Where did ya’ll get your plastic? I can’t fing a 20′ by 50′ roll anywhere. If you could email me to the address above, i would greatly appreciate it. I love your blog! Keep Blogging!!!!!
Thanks AG! I had something like this in mind using black steel pipe at first, but also had thought about using pvc pipe. I just want to get a head start in my garden raising tomatoes. I can do this in the middle of March I’ll have a months head start on my competitors. And I don’t have to worry about snow much, but maybe wind. I’m in Illinois with a veggie garden. I appreciate all the time it took you to make this site and photograph and write the procedures!
We’re at 4500′ in north central Washington state, long, sold, snowy winters. What adaptations would you make for, say, 20 below to 20 above weather, and what about snow load? Appreciate your thoughts.
To structurally strengthen this greenhouse, you can run rebar through the length of your pvc pipes. Most of the snow slides off anyway (though you may need to shovel the sides a bit if the snow gets really deep – I’ve never had this problem.) I would also recommend going with a thicker woven poly like what you would find at http://www.northerngreenhouse.com/ If you plan on heating it through the winter, check out comment #18 of this post by Tony – He’s got some good thoughts.
that s very good idea im going to try it 😉
Very interesting but what sort of plastic would you use if you live in Africa, won’t i get a problem with the sun?
The plastic that I mentioned from Northern Greenhouse in a few comments above has UV inhibitors so that even in constant direct sunlight, it should still last 3 – 4 years. The key is to have anything that touches the plastic colored white and to have good ventilation.
The greenhouse poly seems to come only in narrow widths, 10′ or 12′. Does that work for this greenhouse that requires a 20′ wide piece? Is it better to use heavy mill vapor barrier?
If you’re looking at the poly from Northern Greenhouse, they can join the 10′ strips to make whatever size you want. Heavy mil vapor barrier should work as well – though I can’t imagine it would have the life span of greenhouse poly.
The company I spoke to here in Ontario was L&R Shelters, they sell greenhouse kits as small as 12′ wide. They will also just sell you the poly for .11c sq/ft it is a 6mil uv treated greenhouse poly which has a 4 yr warranty. This is the industry standard that most nuseries use, as it was explained to me the poly will last 6-7yrs, the warranty only goes 4yrs because as the poly ages you start to lose light transmissions required for certain plants/ vegtables. The problem some might have with ordering this poly is getting a piece small enough, as a 12×32′ house would require a piece that is considered an off cut.
I spoke to 1 of their customers who built his own frame and used the 6mil poly, it was a double layer inflated with a small fan. He said the poly was 9 yrs old! Which I found hard to believe but he showed me the date stamp on the poly 1999. His fig trees didn’t seem to care about getting less light and he said the reason it has lasted so long was because it was inflated so when the weather gets really hot and the poly stretches it just has more air between the layers and never gets loose. Here is a link to their site.
http://www.lrshelters.ca/index.html
Awesome idea! I live in alberta and am going to give this a try!
I should have mentioned that if hail is your concern you should go with the 10mil.
Tony, thanks for the link – looks great!
The best set of instructions I have seen. Best wishes from Ireland
my dear friend , i`m so thanksfull to you , i tried to find a new way for makeing a greenhouse., so now you makeing a new knowleg about my question . ( mahdi ramazy from Islamic Republic Of Iran – Tehran-Shahriyar) ..
what a great step by step tutorial. I have plans for one this year and will certainly be referring back here for hints…thanks so much! First time visiting and am enjoying very much, Kim
I really like the plan for make the greenhouse, but the greenhouse poly that I am considering to buy cannot be touching PVC plastic or vinyl. I was thinking, could I use a galvanized steel tubing? Thanks
Sure. I would choose steel tubing over pvc if cost wasn’t an issue. Most commercial greenhouse use steel tubing.
Hi, thank you for your tutorial and great pics. I am planning one following your guide but half the length. This looks perfect for our needs. I linked to your page on my blog to give you credit. Thanks bunches!
http://www.growerssupply.com/farm/supplies/prod1;gs1_cold_frames_high_tunnels;pg103083_103083.html
This company sells a light weight 8×24 steel hoop house for $399us. I don’t know if it includes poly or not?
I used one of the carports that you see everywhere for a frame to build a greenhouse for a friend.
This is awesome! I’m so glad you posted it. I am trying to build a predator-proof aviary for my rescued pet ducks, and this will work perfectly. I was pricing out dog runs and specialized buildings, but this is WAY more within my price range. I am covering it with heavy 1″ predator-proof avian netting all around, except for the door.
Just perfect. Thanks for the detailed supply list as well.
Hi… this the most wonderful site I seen. I have dreamed for the passed 5 years to build myself a green house but never could see the way to afford to get enough money for one. I was checking out differant sites and run acrossed yours, it is wonderful I wa so blessed to find it. The next day I showed my husband and he said “wow” that seems easy enough, so within two days I had all the supplies I needed,and got home and within and hour and 15 min. we had the frame build and the rebar set in and the pvc pipe placed, oh what joy it brought to my heart. Our green house is an 12′ by16’…..thank you so much. you are a blessing to many. bye for now Nancy-Jo
great idea . I am a market gardener from pei with a need to extend my growing season I think this may be what i need or at least can afford.
I am just a little nervous of the half inch pvc frame.would it not shift in heavy winds.
I’m not sure how your wind would compare to ours, but I haven’t had a problem. The rebar anchors it to the ground, but still allows the frame to have some flexibility.
If you use double poly with wirelocks or batten tape, keep the inflation fan running during the winter and summer. The poly will survive hail much better if inflated. Growers Supply has the fan kit with the blower, flex pipe and pass through for the inside poly layer. They also have rolls of narrow felt, sticky on one side, that you can attach to the pvc to protect the poly. You can get corkscrew ground stakes, like you would use for a dog, there too. Use these to secure your boards to the ground. As stated above, most greenhouses would have the boards on the outside of the pvc. You don’t want to invest all that money and time in making a giant kite. I speak from experience. I use the ground stakes every 5 feet with ratchet tie-downs. Two additional purlins, like the one at the ridge, one on each side, should help with the snow load and sagging.
Dave first let me thank you for this wonderful design! I am a collector of Japanese Maples and I live right on the border of zone 5 and 6…of course most them are hardy to zone 6 and so I am so excited about this greenhouse as a way to protect my maples in the winter as well as late frosts when thyey have already started to leaf out. I either dismantle it in the summer or convert part of it into a partial shade house in the summer. But I am wondering what is the lifespan of PVC exposed to the elements? I love the idea of using PVC but if it isn’t going to last more than 4 or 5 years I might consider the metal hoop. How long has yours lasted? Also another great resource for greenhouse suplies including plastic is farmtek.com I have bought from them many times and LOVE them!
Vicki
I’ve found that the PVC does get brittle with time. Because I’ve changed my design several times, I’ve only had the same PVC in use for one year at a time. But with the brittleness that I’ve seen, I would have doubts that it will last 4 – 5 years. If you’re looking for a long term greenhouse, you’ll probably want to go with steel.
I live in Calgary, in an apartment building and luckily for me I live on the main floor and I have a small patio. 3 yrs ago I had a raised (waist high) 3’x6′ garden box (on legs) built but being a beginner gardener I had little success. I love the idea of building my own green house however, I’ll have to figure out a way to build one to accomodate my existing box, where I can raise the plastic to access the plants (since I can’t walk in it) but still seal tightly when the plastic is down. I’m open to any suggestion 🙂 Thanx for sharing your ideas and experiences.
Well we just built this greenhouse, with a few changes, we made ours 10×22.
We put a peice of strapping 2 feet off the floor running the liength of the greenhouse to sturdy it up.
We also used strapping in the top centre (instead of pipe and zip ties)attached to the hoops with the metel electrical bands , we got a box of 50 for 8$
It was complete in 2 days!
Its wonderful!
When we bought our farm it came with a huge pile of electrical conduit, enough for 3 or 4 of these greenhouses.
We plan to build another very soon.
We could’nt of been happier to find this design!
Good job!
It is now full of many vegetables , flowers and herbs getting ready for the upcoming season.
Happy gardening ,
Stacy
i like the greenhouse. I was so happy when i found the design its going to help me out alot. QUESTION! what kind of plastic did you use on the green house?
This plastic is just 6 mil plastic from Rona. It held up pretty good over the winter, but I would still recommend going a little stronger with a 10-12 mil plastic. You can find some great stuff at http://www.northerngreenhouse.com
Hi Dave
I followed your instruction and built the green house. It took 3 afternoons (after work). I am amazed how easy and cost effective it was (about NZ$200) it is 6mX3m very big. We are very lucky, not needing any heating systems as winters are not very cold here. Sun is sufficient enough. I have some pics but I don’t know how I can send it to you. Thanks mate!!!
Superb !!
Dave, Do you think it would be possible to make it wider and taller by joining two lengths pf pvc pipe together. I would like to get 20ft wide. Is this possible or would it compromise the strengh too much. How about using thicker pipe ?
Thanks
20ft wide using the pvc pipe would likely be too flimsy. If you want to go that route, you could try a 1/2 inch rebar. Or another way to go is A-Frame Style. I built one like that last year, but I used too cheap of plastic. My brother made one just like it with 11 mil plastic and it worked great!
Thanks Dave, Could I go up tp 16ft wide. If I use 3/4 or inch pipe would it bend enough to create the hoop, or would this be too rigid.
thanks
I haven’t tried the 3/4 inch pipe, so I couldn’t say for sure. But I would guess it should work. Are you still planning on using 20 ft long pipes? That would make your roof pretty low, unless you put them on top of a short (maybe two foot tall) wall. Also, if you’re planning on leaving the plastic on over the winter, you might need to be concerned about the snow load on such a low angled roof.