Hoop-frame greenhouses are amazing! If you’ve been following my blog for long, you know I love my greenhouse. But as good as it is, I wanted to make it even better. I wanted to extended my growing season without adding a the cost of a heater. In 2009 I tried using milk jugs full of water to hold the heat and slowly release it through the cool of night. That worked pretty good. But what else might I try?
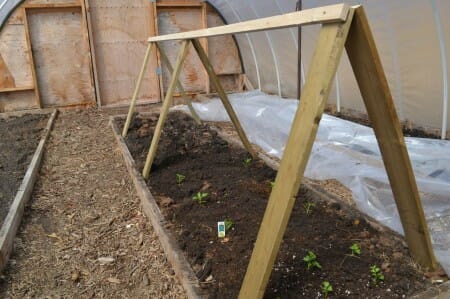
Well, here is what I did this spring: Now this probably isn’t a brand new idea. I’m sure someone has done it before, but its new for me. (And maybe for you too.) I decided to make a mini-greenhouse WITHIN my greenhouse.
It was fantastically easy (it took all of ten minutes to build it) – and completely inexpensive – I simply used materials that were leftover from other projects. Here, let me show you…
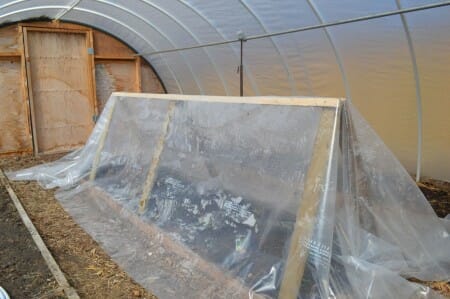
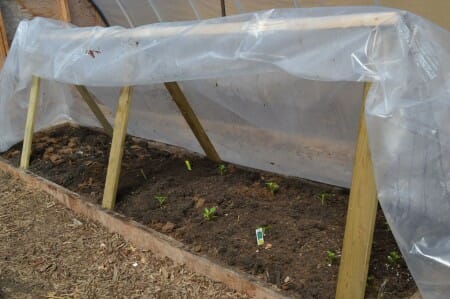
I just took six planks (1x6s – about 30 inches long that were leftover from my fence project last fall), and tucked the bottoms inside my planting bed frame. Then I screwed the tops together and attached a long 1×2 (8 ft long) that served as the peak of my greenhouse. It was absolutely simple. Then I just took and threw over some plastic like this…
Then I ran some tests to see just how much of a difference it would make at night. Remember this is with NO additional heat.
On the night of May 2, the overnight temperature got down to 3.1° celsius outside in my garden. The greenhouse was a little warmer, going down only to 4.8° celsius. But inside my mini-greenhouse within my greenhouse, the temperature stayed up at 7.4° celsius. That’s 4.3° warmer than outside with NO extra heat. That might not seem like a large number, but that makes a significant difference in your growing season. That little, inexpensive “greenhouse within a greenhouse” project, according to the weather almanac, could have just added 9 days to my growing season – for FREE!
And of course, if I had wanted to heat that little greenhouse, it would be much cheaper to heat that little space than to heat the whole greenhouse. So maybe I’m over-reacting, but I think this is way cool and will doing this project again next year – nine days earlier!


10 replies on “A New Inexpensive Greenhouse within a Greenhouse Solution”
I am pretty new at gardening, I love it, but am not very good at it yet….I have one of those snap and grow greenhouses (unheated), and was wondering how long to wait before I can move all my seedlings in there overnight? Is 3 degrees at night too cold still? I see that you have something planted in your greenhouse in these pictures, what do you have growing?
Shelia: My rule of thumb for planting out into my greenhouse is “Anytime in May when the 14 day forecast has no minus degree lows.” So if 3 degrees is as cold as it gets, you’ll be fine. As to what I have in my greenhouse, at the time these pictures were taken, I just had some peppers and celery.
Great, thanks for the advice, I think I will be busy this weekend!! I love your website, you have lots of great ideas and tips!
I am limited for window space for my seedlings so my husband and I bought some damaged ARXX blocks from the local UFA and constructed a 10 X 10 nursery for our seedlings. we tied the ARXX together as tight as we could and lined the inside with plastic. Made some 2×4 tables, put a small temp controlled space heater on low heat, constructed a good lid and voila,we put our seedlings out in the middle of April (in minus 5 some nights) without loosing one plant. We just dismantled the mini nursery in May and put it away for next spring. FYI we had a temp gauge inside to check and make sure our temperature wasn’t dropping to low the first few nights and the little heater was enough to keep it warm without running all night. In the morning we propped the lid open, shut the heater off and went to work. we were very please with how this worked. By may we could move to the plants to the big green house. I saved a bundle on bedding plants this year and all it cost me was a few dollars for Damaged ARXX Blocks that I can use for years to come.
If you want to easily and inexpensively add a few degrees of heat to a greenhouse like this take some inexpensive short table lamps that hold a 60w lightbulb and make a shield out of tinfoil around it or cover it with a large tin can to block out the light. You only want the heat from the bulb, not the light. Adding several hours of low level light to seedlings and small plants will tend to stretch them. 6 to 8 lights would probably keep it warmish on a -5C night. Use a small fan to move the air around, heat rises and you want it at the ground where the plants are. A small fan will also ensure there are no cold corners. You only need to have them on as your night temperature starts to drop quickly, usually from about 2 or 3 am until an hour or two after sunrise so invest in a small timer. If it’s a cloudy day you can also turn them on to keep the chill off your plants. Your tomatoes and peppers do not respond well to chilling, especially as seedlings or new transplants.
I’ve used a string of Christmas lights under my row covers and was able to keep some tender vegetables in my Fort McMurray garden well into the end of October.
We live in southwest Ontario is the green house all year around?
thank you
Have you considered building a rocket mass heater to heat your greenhouse?
http://www.richsoil.com/rocket-stove-mass-heater.jsp
I guess red is a theme- the kale and romaine are in a room paeintd a deep burgundy so naturally the lens picks that up!I like your play on words there with the sturdy cold house Wish I could join you for a cup of tea! I’m stir crazy and snowed in.
I know this is an old post, so you probably won’t see my suggestion, but….. I watched a video the other day on a self contained greenhouse system, in Wisconsin, and they made their compost in their greenhous. The heat from the compost pile was enough to actually keep the greenhouse warm through the winter. It was a large, long, trench-like compost pile that ran the length of the greenhouse. It was so warm they were even able to keep fish thru the winter.