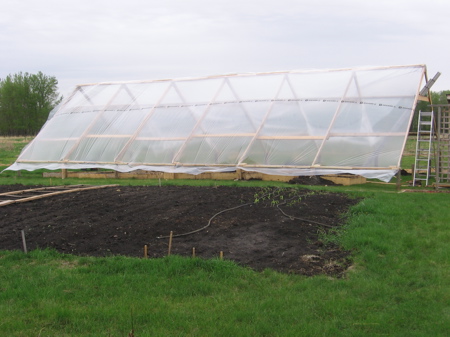
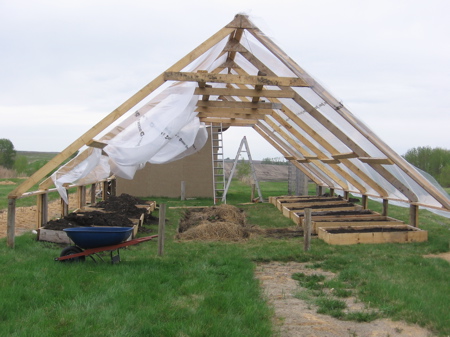
As of today, phase one of my giant A-frame greenhouse is complete. It stands about 12 feet high, 24 feet wide, and 48 feet long. I have a single layer of 6mm plastic on the north and south sides with the ends currently open. I plan to enclose them before the frosts this fall (that’s phase two), but I’ll leave them open throughout the summer.

The entire structure is built on top of fence posts. I did this because my lumber wasn’t treated – this way the wood won’t sit on the ground a rot right away. The lumber for the structure is just rough 2×6 boards that I got for a real deal. It’s in pretty rough shape (warped and cracked), but it’ll do for this purpose. It’s cross-braced by some wire my father-in-law had, and the the plastic cost a total of $80. The raised beds are made with 2×10. All said and done – it cost me about $160, plus a good chunk of my time. I’m glad I’m done this far – it was a lot of work. Now I get to do the fun part – planting, growing, and enjoying!

Originally I was going to have a water trench down the middle to for heat storage, but with small children around I opted for a compost trench that should let off quite a bit of heat anyway. Well, see how it goes.
I’m not sure how well the plastic will stand up, but I’m hoping it’ll last the year anyway. If it doesn’t, I’ll have to pay for the more expensive (but much better) 11 mils woven poly.
21 replies on “My Giant $160 A-Frame Greenhouse”
Great job! I can’t wait to see your garden growing.
Now I know where you’ve been….working outside…lol! Good JOB!So, you are going to use this for the summer months, correct?….what are you going to plant in the raised beds?
The primary purpose of this greenhouse is to keep the hail from destroying all my tender crops. I live right in the center of Alberta’s “hail alley” and we’ve had bad hail every year I’ve lived here. So, this is one one I can try to keep them a little safer.
If it works, phase two is to add ends and be able to get things going earlier in spring and keep them later in the fall. I won’t try to heat it though – just passive heating.
I’ve got tomatoes, cucumbers, watermelons, a couple Dill’s Giant Pumpkins, and some peppers ready to go out there. I’ll likely experiment with a whole lot of other misc things too.
Might want to consider tuftex poly sheets instead, as it is hail rated and warrantied. Also the corrugate does well with snow.
HI, AWESOME GREENHOUSES. I AM NEW TO GREENHOUSES, AND ABOUT AS BROKE AS EVERYONE ELSE, BUT I WANT TO FEED MY FAMILY FRUIT AND VEG THAT IS NOT SATURATED IN CHEMICALS. WE LIVE AROUND COCOA BEACH FLORIDA ON THE MAINLAND WITH A HORRIBLE FERAL CAT PROBLEM, HENSE THE NEED FOR AN ENCLOSED STRUCTURE. WHAT WOULD YOU SUGGEST THAT WOULD BE STURDY ENOUGH TO HANDLE THE NOT HURRICANE RELATED WIND AND STORMS? THANKS ANGEL
Hurricane winds would devastate any DIY greenhouse. Build it so when there is an approaching hurricane you can disassemble it in a hurry and stow it away until it passes or until hurricane season is over.
built this and is awesome. now gophers r diging under greenhouse and ate everything. ideas??????
Steve: I don’t a much trouble with gophers (although I’ve had a deer make its bed in my beds when I leave the greenhouse door open), so I’m not sure what to recommend for you other than traps. Perhaps someone else has an idea?
you could dig a 2 ft trench and pack it with chicken wire around the parameter.
“plant” chicken wire about eighteen inches below ground
also gopher hate the ultrasonic “kick” from mini windmills into the earth.
you may consider photovoltaic powered ultrosound devices and augment them.
don hall / bearcreekresearch
We call them Woodchucks here in upstate New York, and after you shoot the thing, bow and arrow is fine, dress them out being especially careful to remove the glands on the rear legs. Soak them an hour or two in salt water to draw out any blood. They are vegetarian, so much like rabbit, although they can be greasy late in the summer when putting on fat to get through the winter…We prefer to can them in marinate when we have several. Flavors and tenderizes the meat. Happy hunting.
Could you please post how to build it?
Tripp: I’ll have to consider that for one of my future posts! But I’d have to try to explain everything from memory, as I have since moved from that yard.
Okay thank you though
We found that if you roll the plastic around the wood and screw it down it will not tear. just helpful hints.
we have had a hard time keeping our doors shut and tight to the frame. any ideas.
Hi, I was wondering how you attached the 2x6s to the fence posts? Did you just cut them at 45 degrees and screw them in with a few screws? Thanks.
Ivan: The angled 2×6 were attached to a flat 2×6 before the flat 2×6 was nailed down to the post. (But yes, the angled ones were cut at the 45 and toenailed in.)
How has the greenhouse held up throughout the years? Would you do anything differently? I’m going to build an almost identical container next year in northern oregon. Thanks for your post!
Ian: The plastic on this version was way too thin to hold up. If I had used the 11mil woven poly from NorthernGreenhouse.com (Like I did with my other greenhouses) it would have held up much better. My brother has one just like this that has held up great for years now.
Hi! Looking for an walipini expert to do a video chat with my class. Would you be willing to do something like this?
Awesome! Gonna build one very similar using ur idea as the wind here in Oklahoma requires a slanted wall. Thanx